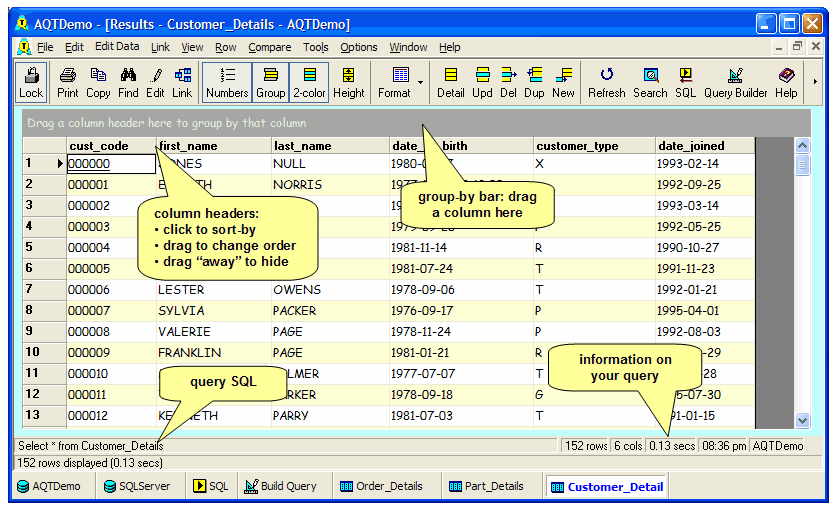
The same window displays either the contents of a table, or the result of a query.

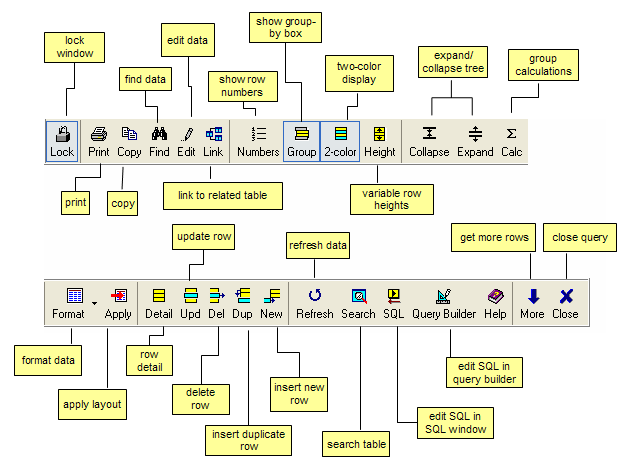
Principal functions of the window are:

Many of these buttons will only be visible in certain circumstances:
You can customize the buttons that appear on this toolbar.
Some tasks available in the Data Display Window have shortcut keys.
You can save the data in this display (to disk) and retrieve it later. This is very useful if you are displaying some useful data that you may wish to refer to at some later time.
Use File > Export Data (or F7) to export your query results to a file. This will open the Export Data window where you can select the options for the export.
You can select cells in a number of ways:
As you select the cells, information about the range of cells you have selected will appear on the status bar at the bottom of the window.
To copy some cells (to the Windows clipboard), select the cells (as described in the previous section), then hit Ctrl+C, click on Edit > Copy, or use the copy icon.
If you are copying more than one cell, you will be prompted for a number of copy options. These are discussed in more detail in Hints on Grid Usage.
To do this, click on Row > Update mode, Delete mode etc, or click on the appropriate icon. These will take you into Update Mode in the Row Display window.
You can also edit data directly in the Data Display window. Quickly make small amendments by using the right mouse menu.
If you have run an update and changed the data, hit Refresh or F5 to redo the query and redisplay the data.
The sort order, row and column position, and grouping will be reestablished after the data has been refreshed. If you have done a Find (Ctrl+F) with the "Only show rows that match" option, the find will be reapplied. Other formatting of the data will be lost; if you have a saved-layout for your data, you can reapply it with View > Apply Layout.
You can also do a Full Refresh (Ctrl+F5) - this refreshes the data without restablishing sort order, row/column position or grouping.
To amend the query that is displaying the data, you can click on either:
You will see the Get More Rows button if you have enabled the Get More Rows feature (see Options > Run SQL) and haven't retrieved all the rows from the table/query. This button will get another set of rows from the table. This enables you to scroll through a large table, even if your Max Rows Displayed option is set to a low value.
When this button is visible, your query is still active and (depending on your database) will be consuming resources on the database. As soon as you have finished viewing the data you should close the query: use the Close Query button (or Ctrl+Z).
Note: Get More Rows will only scroll you forward in the database. There is no option to get the previous set of rows.
This will close the active query. Once the query has been closed, either when you have clicked on this button or when the table/query has been read to the end, the Get More Rows and Close Query Cursor buttons will no longer be visible.